Thursday 30 March 2017

Add custom activity in UIActivityViewController

In iOS we can share the content of an app to the social world(Facebook,twitter, gmail and many more ) using UIActivityViewController. UIActivityViewController shows the list of activities when presented on a UIViewController. Each activity in the UIActivityViewController represents the media  type which allow to share the content of our app.

We don't need to integrate the designated SDK to share the content. All  tasks are handled by UIActivityViewController itself.
To share the content(like photo or text) , follow these steps:

1) Create an instance of UIActivityViewController by passing required arguments.

let textItem =  "Welcome here"
let imageItem = UIImage(named:"hello")
let activityC = UIActivityViewController(activityItems: [imageItem,textItem], applicationActivities:nil)


The initializer method of UIActivityViewController require to pass two arguments named activityItems:  and applicationActivities: . In first parameter we must pass the array of items to share. In our case it is an  image and a text. In second parameter we pass the array of activities which we add custom . These activities are not provided by the UIActivityViewController . We will talk later about custom activity and see how to create a custom activity and show in UIActivityViewController . Here we pass nil for applicationActivites: .

2) Present the activityViewContoller from your view controller:

self.present(activityC, animated: true, completion: nil)

We can exclude the activities which we don't want to be listed in UIActivityController by setting the value of excludedActivityTypes of UIActivityViewController.

activityC.excludedActivityTypes = [.airDrop,.assignToContact,.postToVimeo,.postToWeibo,.postToFlickr,.postToTencentWeibo,.print,.copyToPasteboard,.openInIBooks,.addToReadingList]

To check which activity the user has interacted with , pass a closure to completionWithItemsHandler property of UIActivityViewController:

activityC.completionWithItemsHandler = {
           (type, success,items,error)->Void in
            if success{
                print("item shared of type \(type)")


            }
}

Here we see how to share the content with UIActivityViewController and a brief introduction of important  properties of UIActivityViewController.

We can customize the UIActityViewController such that we can define the custom action for each activity , assign different data for a  UIActivity and  many more . To accomplish these kinds of tasks we have to subclassed either UIActivityItemSource or UIActivityItemProvider and then we pass the array of objects of UIActivityItemSource or UIActivityItemProvider to the activityItems: parameter of initializer method of UIActivityViewController . Here we won't go in to the details , these require an another blog.

CustomActivity: 

To create an application activity we subclass the UIActivity and override the methods and properties of UIActivity class.  In our subclass we return the activity title, activity image and activity type and UIViewController for the activity, from the designated properties.


class CustomActivity: UIActivity {

    // returns activity title
    override var activityTitle: String?{
        return "MyActivity"
    }
    
    //thumbnail image for the activity
    override var activityImage: UIImage?{
        return UIImage(named: "")
    }
    
    //activiyt type
    override var activityType: UIActivityType{
        return UIActivityType.postToFacebook
    }
    
    //view controller for the activity
    override var activityViewController: UIViewController?{
        
        print("user did tap on my activity")
        return nil
    }
    
    //here check whether this activity can perfor with given list of items
    override func canPerform(withActivityItems activityItems: [Any]) -> Bool {
        return true
    }
    
    //prepare the data to perform with
    override func prepare(withActivityItems activityItems: [Any]) {
        
    }

 }


 To use this in UIActivityViewController pass the instance of CustomActivity to the applicationActivities parameter of initializer method of UIActivityViewController . 

let activityC = UIActivityViewController(activityItems: [imageItem,textItem], applicationActivities:CustomActivity())


References:
https://developer.apple.com/reference/uikit/uiactivityviewcontroller
http://nshipster.com/uiactivityviewcontroller/


Monday 27 March 2017

Set attributed text in UITextView dynamically

In UITextView we can set both plain and attributed text. We can easily monitor the changes in the state of UITextView by its delegate methods.

Today we will see, how to set the attributed string in a  UITextView. For example, to set attributed string dynamically , we can change the attribute for a string in shouldChangeTextIn range: delegate method.

To set the attributed use typingAttributes property of the UITextView in   shouldChangeTextIn range: method:

 textView.typingAttributes = [NSFontAttributeName:UIFont.systemFont(ofSize: 17, weight: UIFontWeightMedium)]

The above line of code set the attribute for the whole text in textView. For changing attributes for specific case assign different attributes to typingAttributes property.Now you will see your text will appear with attributes you set to the typingAttributes property as you type.


Thursday 16 March 2017

Parent-Child hierarchy using UITableView

UITableView gives us a way to list our data in a row where each row represents a one data. This data may vary from a single string to a composite object .

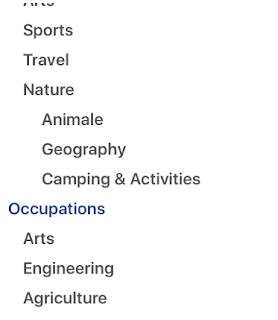
With UITableView we can show the parent child relationship to many indent level, like shown in this image:


You can implement above structure with UITableView, which will give you following functionality:
- Allow users to tap on one row to open and  close the sub tree , if selected row represents a parent.
- Automatic scrolling of data as new row instead and deleted with animation.

To implement this, follow these steps:
1) First of all create your iOS project and setup view and add a UITableView in your view controller. Also setup all necessary step like registering class for UITableView and set datasource and delegate appropriately. I am not telling all these basic step here. We will focus on how to implement above structure with UITableView only.

2) The key part of this application is data structure . Maintain your data in such a way that we can insert and delete row runtime and can distinguish between parent and child row.
   
For this I create a object which will tell all I need:

var nodeName:String
var isNodeChild:Bool
var arrChildren:[Node]
var indentLevel:Int


In starting we will show only parent node i.e. the node with indent level one.

3) In didSelectRowAtIndexPath: method of UITableView, check if this row represents a parent node and  this row already expanded to show the child node of the parent node or not.

We assume that row is not expended yet . If node for this row is parent , then get the number of children of this node and edit the main data source of your table view and insert the new rows to show the child of the node.

4) To show the difference between parent and child set the indent level of child row greater than the parent row.

5) To collapse the expanded parent , delete the child node of parent node i.e. First edit your data source and then delete the child row for the selected row.

Conclusion : We choose UITableView for this because UITableView provides much more we want. Automatic scrolling of data, easy insert and deleting of rows with animation . All we need here is to maintain the datasource of UITableView.

how to get current device language in english as display name in iOS

Hello,  I am here once again with a new blog. In this we will see how to get the device language in an iOS app. When we see first time, it seems very easy to get the current device language. The NSLocale class provides all methods to get most of the device information out of it.

So let's do write some line of code to get the device language:

1) To get the current identifier :
   
     NSLocale.current.identifier

If your device using en-US as language , the above line will return en_US as a result. 

2) But the this is not what I was looking for. I have to show the full  language name in my last project. For example English for en, German for de and so on as listed  in apple spec. 
To show the full language name as I wanted, I  googled many pages and found answer on stackoverflow as:

a) Get the first element from the array of preferred languages:  

        let lang = NSLocale.preferredLanguages[0]

b) Get the locale object

    let locale = NSLocale(localeIdentifier: lang)

c) Get the localized string for a language code

 let fullName = locale.localizedString(forLanguageCode: lang)!

In first line we get the language identifier from the array of preferred language . This array holds the language identifier for each language shown in preferred language category in an iOS device. Each element of this array show the abbreviate form for the given language(en_US for English (United state) and so on). 

In second line we got  the NSLocale object by passing language identifier got in step 1. And in last line we get the localized string for the language code from locale object created in step 2.

On execution of above lines of code, the result will be English for en_US, Deutsch for de-DE.

But what is this? It's not what I was looking for yet . The above code give the localized name for the given  identifier. From  output we can see that if my device is using some symbolic language like Chinese, the output will also be symbolic.

Now to show the name of the language in English , for example English for identifier  en, German for identifier de, Chinese for identifier zh, change the identifier parameter of  NSLocale(identifier:) to "en" as:

    let locale = NSLocale(localeIdentifier: "en")

That's it.

Sunday 5 March 2017

Download and upload data to server

In iOS development if we are working on an app which have a backend for managing it's data on the server , we need a mechanism to retrieve and push our app specific data on the server . To implement this , Apple provides a class NSURLSession. NSURLSession provides all method and properties for uploading and downloading data from the server .

Here I am introducing a brief introduction of how to use NSURLSession class . For more deep details  you can go to documentation of NSURLSession class on apple's site.

NSURLSeesion API can be used in two ways:

1) With system provided delegates
2) With custom delegates

We should use custom delegates if our application does one of the following tasks:
1) App uses background session to download and upload content
2) Perform custom authentication
3) Limits caching programmatically
4) Limits HTTP redirects programmatically
5) Perform custom SSL certificate verification

 The life cycle of system provided delegates :

1) Create a session configuration object. For a background session , this configuration must contain a unique identifier. We must store that identifier to use it to reassociate with the session, if app crashes or is terminated or suspended .
2) Create a URLSession object ,specifying  a configuration object and a nil delegate.
3) Create a task object within a session that each represent a resource request and call resume on task because each task starts out in a suspended state. We must call resume on the task  in order to begin the task.

  Characteristics of a task object:

  • The task object is  a subclass of NSURLSessionTask, NSURLSessionDataTask, NSURLSessionUploadTask,NSURLSessionDownloadTask. 
  • We can add more than one task to a session. 
  • If we are using NSURLSession without  providing a delegate, we must create a task using a call that takes a completionHandler parameter. 
  • For a download task :
    • To pause the download, cancel the task by calling 
      • CancelByProducingResumeData
    • To continue the resumed download, pass the resumed data from above method to one of two methods:
      • downloadTaskWithResumeData:
      • downloadTaskWithResumeData:completionHandler:
    • When a task completes , NSURLSession object calls the task's completion handler.
4) When a session is no longer needed, call
             invalidateAndCancel 
     or
             finishTaskAndInvalidate
according to your requirement.

Note: NSURLSession doesn't report server error through the error parameter . The error parameter only show the client side error. To handle server side errors, we must check status code of the task  in HTTPURLSessionResponse object.