Friday, 9 October 2015

Delegate in iOS

Delegation is a simple and powerful pattern in which one object in an app acts on behalf of, or in coordination with, another object. The delegating object keeps a reference to the other object—the delegate—and at the appropriate time, the delegating object sends a message to the delegate. The message informs the delegate of an event that the delegating object is about to handle or has just handled. The delegate may respond to the message by updating the appearance (or state) of itself or of other objects in the app, and in some cases it will return a value that affects how an impending event is handled.

A common design uses delegation to allow a child view controller to communicate a value (typically a user-entered value) to its parent view controller.

The idea behind delegates is that instead of class A executing some code, it tells it’s delegate to execute that code.  The delegate is tied to another class (let’s call it class B).  In order to facilitate this, class A creates something called a protocol.  This protocol has a list of methods in it (with no definition).  Class A then has an instance of the protocol as a property.  Class B has to implement the protocol defined in class A.  Lastly, when class A is created, it’s delegate property is set to class B. 

Example:
Let’s say we have two objects, Brain and Beer Bottle, Brain is the object we use to manage the entire Body application, it handles all of the important tasks such as poop, eat, drink, sleep etc. Beer Bottle is attached to body but it doesn’t know what Brain is thinking, likewise, Brain has no idea what Beer Bottle is thinking.
Brain is using Beer Bottle’s attributes to satisfy itself while it’s watching TV, but the problem is that brain is so distracted by the tv that it can’t pay attention to when beer is going to run out. This could all end in disaster, Brain needs to know when beer is empty so that it send body to the fridge and initialize another instance of Beer Bottle.


Brain can use the drink function to lower Beer Bottles liquid variable, but once liquid reaches 0, Brain needs to know about it, this is where delegates come into action, we can use a Beer Bottle Delegate. Brain can listen out for the Beer Bottle Delegate telling brain that the bottle is empty, all we need to do is simply tell Brain to listen out for Beer Bottle telling it’s delegate that is empty and Brain can react to it. This well thought out and illustrated diagram shows all of this in action:
Creating Custom Delegates: 
For example we want to send a message to application when printing job is done in order to take appropriate action based on the message.
1) interface file
#import <Foundation/Foundation.h>
@class Printer
@protocol PrinterDelegate <NSObject>
-(void) FinishPrint;
@end
@interface Printer:NSObject{
id<PrinterDelegate> delegate;
}
@property(nonatomic, strong) id<PrinterDelegate> delegate;
-(void) printData;
@end
2) Implementation File
#import Printer.h
@implementation
@synthesize delegate; 
-(id)init{  // initialization code }
-(void)printData{
// printing instruction
[delegate performSelector@selector(finishPrint)];
}
@end
3) Finally , the class that implements printerDelegate, might have its own interface like this:
#import <UIKit/UIKit.h>
#import Printer.h
@interface MyViewController : UIViewController<PrinterDelegate>
@end
Now in implementation file we must implement the finishPrint method as:
-(void)viewDidLoad{
Printer *printer = [Printer alloc]init];
printer. delegate =  self;
}
-(void)finishPrint{
NSLog(@"printing has been done successfully");
}
References:
https://developer.apple.com/library/ios/referencelibrary/GettingStarted/RoadMapiOS/DesignPatterns.html
http://enroyed.com/ios/delegation-pattern-in-objective-c-and-writing-custom-delegates/

Friday, 11 September 2015

NSNotificationCenter

If you want to simply share a message that a job has completed and perhaps have several other classes listening out then NSNotificationCenter might be the best option for you.
Note: Using NSNotificationCenter we can send the data only with in the app. we can not send data to other apps.

Notifications classes

Foundation provides 3 classes to deal with all your notification needs:
  • NSNotification: represents a notification.
  • NSNotificationCenter: broadcasts notifications and manages observers. Each app has a default notification center via defaultCenter.
  • NSNotificationQueue: coalesces and delays notifications. Each thread has a default notification queue via defaultQueue.
Receiving notifications: To receive a notification you need to know only its name.

[NSNotificationCenter DefaultCenter]addObserver: self selector:@selector(applicationDidReceiveMemoryWarning:) name:UIApplicationDidReceiveMemoryWarningNotification object:nil];

Observer:  Object that receive a notification is called observer.Observers register to a specific notification by specifying the name of the notification (usually a constant) and the sender of the notification as filters. Both are optional; in the above example, we don’t care who the sender is so we pass nil.

Handling Notification:

Observers will receive notifications until they are removed from the NSNotificationCenter.Each notification is sent once per addObserver call.NSNotificationCenter  will call the selector provided in addObserver:selector:name:object: with a single argument of type NSNotification. The selector is called in the same thread in which the notification was posted.

Removing Observer: NSNotificationCenter  provides two methods to remove observer. removeObserver: and removeObserver:name:object:. The former unregisters the observer for all notifications, and the latter does so for notifications of the given name and sender, either of which can be nil.

Posting the Notification:Each app has a default NSNotificationCenter instance that can be used to broadcast notifications. You can create the notification object yourself and post it, or use a couple of convenience methods that do this. If you don’t need to send any additional information, posting a notification is as simple as:

[[NSNotificationCenter DefaultCenter] postNotificationName:notificationName object:notificationsender];

The notification is then sent to every registered observer in no defined order. Notifications are posted synchronously, meaning that postNotification: and its convenience methods will not return until all observers have processed the notification. Additionally, observers will be called in the same thread in which the notification is posted. Unless you explicitly state otherwise, observers will expect this to be the main thread.


You can send additional information also as:
NSDictionary *userInfo = @{@"myKey",@"myValue"};
[[NSNotificationCenter DefaultCenter] postNotificationName:notificationName object:notificationsender];

Friday, 21 August 2015

Swift String

Swift's String and character types provide a fast, Unicode- complaint way to work with text in our code. The  syntax for string creation and manipulation is lightweight and readable, with a string literal syntax that is similar to C.

Swift's String type is a fast, modern string implementation. Every string is composed of encoding- independent. Unicode characters, and provides support for accessing those characters in various Unicode representations.

Swift’s String type is bridged with Foundation’s NSString class. If you are working with the Foundation framework in Cocoa, the entire NSString API is available to call on any String value you create when type cast to NSString, as described in AnyObject. You can also use a String value with any API that requires anNSString instance.

1) To create empty string literal:

      var emptyString = ""

2) To initialize a string use the initializer syntax:

     var  strName = String()

3) For example:

    var strName = "Jitendra"

   if strName. isEmpty {
     println("string is empty")
}
else{

println("string is not empty")
}

Swift's String type is  a value type. If you create a new String value, that String value is copied when it is passed to a function or method, or when it is assigned to a constant or variable. In each case, a new copy of the existing String values is created, and  the new copy is passed or assigned, not the original version.

4) Swift’s String type represents a collection of Character values in a specified order. You can access the individual Character values in a string by iterating over that string with a for-in loop.

example: 
              for character in strName{
              println(character)
             }

5) To retrieve a count of the Character values in a string, call the global count(_:) function and pass in a string as the function’s sole parameter.

6) String values can be added together with the addition with the addition operator(+) to create a new String value : 

  let firstName = "Jitendra"
  let lastName = "Solanki"

  var fullName = firstName + lastName

Working with index:

Each String value has an associated index typeString.Index, which corresponds to the positions of each Character it contains.

As mentioned above, different characters can require different amounts of memory to store, so in order to determine which Character is at a particular position, you must iterate over each Unicode scalar from the start or end of that String. For this reason, Swift strings cannot be indexed by integer values.

7) Use the startIndex property to access the position of the first Character of a String, and the endIndexproperty to access the posision of the last.

8) A String.Index value can access its immediately preceding index by calling the predecessor() method, and its immediately succeeding index by calling the successor() method.

9) Use the global function indicies(_:) to create a Range of all of the indexes used to access individual characters in a string.


Inserting and Removing :

10) To insert a character into a string at a specified index, use the insert(_:atIndex:) method.
  • var welcome = "hello"
  • welcome.insert("!"atIndexwelcome.endIndex)
11) To insert another string at a specified index, use the splice(_:atIndex:) method.
  •         welcome.splice(" there", atIndex: welcome.endIndex.predecessor()

12) To remove a character from a string at a specified in index, use the removeAtIndex(_:)method.
13) To remove a substring at a specified range, use the removeRange(_:)method:
    example:
                let range = advance(fullName.endIndex, -6)..<fullName.endIndex
               fullName.removeRange(range)

Comparing Strings:

Swift provides three ways to compare textual values: string and character equality, prefix equality, and suffix equality.

14) String and character equality is checked with the “equal to” operator (==) and the “not equal to” operator (!=), 

Prefix and Suffix Equality:

15) To check whether a string has a particular string prefix or suffix, call the string’s hasPrefix(_:) and  hasSuffix(_:) methods, both of which take a single argument of type String and return a Boolean value.

Friday, 7 August 2015

Integrate Objective C code into Swift

Apple provide a way by which we can use the code written in Objective C to our swift  project and call methods as they were part of this swift project.

It's very easy to create a new objective c file in swift project or use existing Objective C file in our Swift project.

To understand whole process step by step , lets start a new project in XCode and set language to Swift .

1) After creating simple project we get the list of inbuilt files in Xcode for our project. Now we can either create a new Objective C .h & .m file in this project or we can add existing Objective c file directly into our project .

2) Create a new Objective C .h & .m file :

      A) Right click on project and choose new File .
     
      B) Select Objective C file and click next .

      C) Give an appropriate name to your file, for example it is DemoObjC and create it .

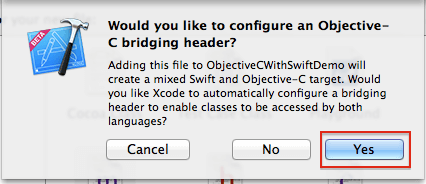
      D) After Clicking Create button XCode ask for configure an Objective -C bridging header. You                must say YES . 
           The given dialogue box shown only once when first Objective -C file creates in Swift Project. 

configure an objective


Now we have an Objective- C bridging header and DemoObjC.m files in our project . But we don't have  DemoObjC.h in our project, so create a header file and named it same as DemoObjC .m .

    E) Right Click on project and choose New File .

    F) Choose header file and click Next .

   G) Give file name , this name must be same as a .m file which is previously created .

    Now we have both  .m & .h file, do code now of your requirement .

After writing code in your objective c file , you have to connect it with swift environment with  the help of Bridging Header . Simply import this newly created Objective C file into Bridging Header and that's all .


Now to use the code of this objective C file, simply create object of this  and call the methods .

Lets assume we have a method name doWelcome:text(NSString*), to call this method from swift code, just do :

var demoObj =  DemoObjC()
demoObj.doWelcome("WelCome To  Swift")


3) Add existing Objective C file in Swift project :

    A) Right Click and click Add Files to ..

    B) Choose your folder and select both .h & .m  file make sure that checkbox of copy item if needed is checked and click Add.
  
   C) To use code from this file we have to add the header of this file to Bridging Header.


That's all , how simple it is to  combine the code from Objective C and Swift .

Friday, 22 May 2015

Preserve and Restore the state of the App

State Preserving and Restoration Process:
Application state preservation and restoration is all about presenting the user with application continuity in terms of appearance and behavior. The UIKit preservation and restoration system provides a mechanism by which an application is able to save and restore the state of specific view controllers and views between different application invocations. UIKit achieves this by defining a flexible structure to which the application must conform in terms of providing information on what is to be saved, and implementing methods that are called by UIKit at certain points during the preservation and restoration process.

During the application design process, the developer must decide which view controllers and views that comprise the application need to have state preserved to ensure continuity for the user. Each item for which state is to be saved must then be assigned a restoration identifier. 

Note:If a view controller does not have a restoration ID, none of the controller’s child views or view controllers will be saved, irrespective of whether or not those sub-views have a restoration ID.

Preserve the State:
Each time a running application is placed into the background, UIKit will ask the application whether or not it requires state preservation. In the event that the application requires the state to be saved, UIKit will traverse the view controller hierarchy of the application and save the state of each object that has a restoration ID. As it does this, it will call a method on each eligible object in order to provide that object with an opportunity to encode and return additional data to be included in the saved state. Once the state information has been gathered, it is saved to a file on the local file system of the device.

Restore the State:
When the application is next launched (as opposed to being brought out of the background and into the foreground) UIKit will look for a saved state file for the application. In the event that it finds one, it will ask the application if state restoration is required. If the application responds affirmatively, UIKit will use the saved state to guide the application through the process of re-creating the views and view controllers to the previous state.


The application preservation and restoration is controlled by a series of interactions between UIKit, the application Delegate and preserved viewControllers and views as summarized in flow chart;

State Restoration


Example: 
1) In order to implement state preservation and restoration  ,implement the  methods in the application delegate which return a boolean value to indicate whether or not preservation and restoration are required.

-(BOOL)application:(UIApplication *)application shouldRestoreApplicationState:(NSCoder *)coder{
    return YES;
}

-(BOOL)application:(UIApplication *)application shouldSaveApplicationState:(NSCoder *)coder{
    return YES;

}

2) When UIKit walks the view controller hierarchy of an application to preserve state, only those objects with a restoration ID will be saved.
Restoration IDs can be assigned to objects either in code or from within Interface Builder. The restoration ID can be any valid string and may be assigned in code via the restorationID property of the UIView and UIViewController classes. For example:
myViewController.restorationIdentifier =@"thirdViewController";

3) By default, the following state information is saved and restored automatically for view controllers:
     Currently presented view controller
     Currently selected tab
     State of navigation stacks

In the case of views, the following is preserved by default:
   Current scroll position
   Currently selected cell in a table view
   Current state of an image view (zoom, pan, etc)
   Web history (including scroll position and zoom level)


Saving Additional Information:
4) Some times in we want to save the additional data with object to be saved while preserving the state of the app and restoring.
When the state of a specific view controller is to be saved, it will check to see if a method named encodeRestorableStateWithCoder has been implemented in that object’s class. If the method has been implemented, UIKit will call that method, passing through a reference to an NSCoder object. It is then the responsibility of that method to store any additional state data that needs to be preserved into that NSCoder object before returning. UIKit will then save that NSCoder object along with the rest of the application’s state.

When UIKit restores the view controller object on a subsequent launch of the application, it will call the decodeRestorableStateWithCoder method of that object, passing through the NSCoder object containing the previously stored state data. The method is then responsible for decoding the object and using the data contained therein to restore the view to the previous state.
-(void)encodeRestorableStateWithCoder:(NSCoder *)coder{
    [coder encodeObject:self.txtView.text forKey:@"unsaveText"];
    
    [coder encodeObject:UIImagePNGRepresentation(self.imgView.image)
                 forKey:@"YourImageKey"];
    [super encodeRestorableStateWithCoder:coder];
}

-(void)decodeRestorableStateWithCoder:(NSCoder *)coder{
   self.txtView.text = [coder decodeObjectForKey:@"unsaveText"];
    self.imgView.image = [UIImage imageWithData:[coder decodeObjectForKey:@"YourImageKey"]];
    [super decodeRestorableStateWithCoder:coder];
}

5)Saving General Application State:
There will also be situations where other data may be relevant to the state of the application but not directly associated with the user interface elements. In order to address this need, the following two methods may be implemented within the application delegate class:
  • application:willEncodeRestorableStateWithCoder
  • application:didEncodeRestorableStateWithCoder
The former method is called by UIKit at the start of the preservation process and is passed a reference to an NSCoder object into which state data may be stored. The application:didEncodeRestorableStateWithCoder method, on the other hand, is called when UIKit has completed the restoration process and is passed the NSCoder object into which general state data was previously stored.


References:
http://useyourloaf.com/blog/2013/05/21/state-preservation-and-restoration.html
http://www.techotopia.com/index.php/An_Overview_of_iOS_7_Application_State_Preservation_and_Restoration

Friday, 8 May 2015

share with Facebook from an iOS app


It's amazing to share the experience of one with an app on facebook.  Now it's very easy to integrate social media in iOS app.

To post content, photo or share stories on facebook from an iOS app, Facebook provide the SDK with full support of all the major functionality it have. By using it;s SDK we can directly login to facebook, post data on the timeline or other friends wall and can share the link, photo and posts.


To include these functionality in our app.. some configuration is required.

1) Install the Facebook SDK : Download the latest version of SDK from developers site and install it.

2) Create a facebook app:  First we need to registered as developer on facebook. Then create a facebook  app on developer's site.

and fill in each section for app

  • Bundle ID - iOS Bundle ID that corresponds to your app.
  • iPhone App Store ID - App Store ID.
  • iPad App Store ID -iPad App Store ID if your app is in the store.

3) Configure the Xcode Project:  
     A) Add the SDK for iOS project and add required framework to app.
    
     B)  Edit the .plist file.

       1.Create a key called FacebookAppID with a string value, and add the app ID there.
       2.Create a key called FacebookDisplayName with a string value, and add the Display              Name we  configured in the App Dashboard.
       3.Create an array key called URL types with a single array sub-item called URL Schemes. Give               this a single item with your app ID prefixed with fb.
          This is used to ensure the application will receive the callback URL of the web-based OAuth flow.
4)   In appDelegate.m, add the following code:
               #import <FBSDKCoreKit/FBSDKCoreKit.h>
               #import <FBSDKLoginKit/FBSDKLoginKit.h>
- (BOOL)application:(UIApplication *)application openURL:(NSURL* )url sourceApplication:(NSString *)sourceApplication annotation:(id)annotation {
    
    return [[FBSDKApplicationDelegate sharedInstanceapplication:application
                                                          openURL:url
                                                sourceApplication:sourceApplication
                                                       annotation:annotation];
}


- (void)applicationDidBecomeActive:(UIApplication *)application {
    [FBSDKAppEvents activateApp];
}

- (BOOL)application:(UIApplication *)application didFinishLaunchingWithOptions:(NSDictionary *)launchOptions {

return [ [FBSDKApplicationDelegate sharedInstance] application :application
                 didFinishLaunchingWithOptions:launchOptions]
  }


5) Now our project is configured, we can add different functionality  to our app:
    Sharing
    LogIn With Facebook
    App Events
   Graph API calls


To login with facebook, import the required files and add this code

FBSDKLoginManager *login = [[FBSDKLoginManager alloc] init];
   
[login logInWithReadPermissions:@[@"public_profile", @"email", @"user_friends"] handler:^(FBSDKLoginManagerLoginResult *result, NSError *error) {
        
          if (error) {
            
       // Process error
        }
         else if (result.isCancelled) {
           
            // Handle cancellations
        } 
          else {
            
            // If you ask for multiple permissions at once, you
            // should check if specific permissions missing
              
                      if ([result.grantedPermissions containsObject:@"email"]) {
                      
                          NSLog(@"%@",result);
                          // Do work
                      }
                }
    }];


To share photo on facebook, your controller must conform to  <FBSDKSharingDelegate> to handle different state in sharing

//build your photo content
   
    FBSDKSharePhoto *photo = [[FBSDKSharePhoto alloc]init];
    photo.image = [UIImage imageNamed:@"tom.jpg"];
    photo.userGenerated = YES;
    
    FBSDKSharePhotoContent *content = [[FBSDKSharePhotoContent alloc]init];
    content.photos = @[photo];
    
    FBSDKShareDialog *shareFB = [[FBSDKShareDialog allocinit];
    
    if ([shareFB canShow]) {
    shareFB.shareContent = content;
    
    shareFB.delegate = self;
    [shareFB show];
    }
    else{
        
        UIAlertView * alert = [[UIAlertView alloc]initWithTitle:@"Error" message:@"can't show the share dialog box" delegate:nil cancelButtonTitle:@"OK" otherButtonTitles:nilnil ];
        
        [alert show];
        
    }

and add the delegate method

#pragma mark === delegate method
- (void)sharer:(id<FBSDKSharing>)sharer didCompleteWithResults:(NSDictionary *)results
{
    NSLog(@"completed share:%@", results);
}

- (void)sharer:(id<FBSDKSharing>)sharer didFailWithError:(NSError *)error
{
    NSLog(@"sharing error:%@", error);
    NSString *message = error.userInfo[FBSDKErrorLocalizedDescriptionKey] ?:
    @"There was a problem sharing, please try again later.";
    NSString *title = error.userInfo[FBSDKErrorLocalizedTitleKey] ?: @"Oops!";
    
    [[[UIAlertView allocinitWithTitle:title message:message delegate:nil cancelButtonTitle:@"OK" otherButtonTitles:nilshow];
}

- (void)sharerDidCancel:(id<FBSDKSharing>)sharer
{
    NSLog(@"share cancelled");
}

That's so simple with FBSDK to include the functionality of facebook in our app.